Following on from last issue where we looked at the equipment and capture of video to produce a photograph of the planets this issue looks at the processing of the video into an image. This article really only scratches the surface of image processing as there are so many variables and methodologies that can be used. Having mastered the basics will allow you to experiment and discover the best processing workflow for your requirements.

Assuming that you have captured some video. When you look at it you will find that although it looks reasonable it will be quite wobbly and the focus will fade in and out. What is required is to examine the video and remove all the bad frames, grade the remaining frames, then process the good frames. This may sound complex, and indeed it is, but there are software packages available to handle this processing.
If you think about what a video is you will discover that it is just a series of static images that are played together to form a smooth moving film. Just like the old cartoon flip books you flick through the pages and the image appears to move. We want to do the same, but in our case the image does not move very much.
There are a number of different ways to create video files, and a number of different formats. For the purposes of Planetary Imaging we need to use the AVI format. This creates a large file of individual frames. Other formats such as MP4 have reference frames followed by information on what has changed since the reference frame, this saves a lot of space but is not useful for our purposes we need a format that saves entire individual frames.
The processing software that will be used is Registax, though other applications are available Registax is the most popular. Registax is FREE and if it was not provided with your planetary camera it can be downloaded from the Internet at http://www.astronomie.be/registax/. At the time of writing the latest version available is Registax 6.1.0.8 which is the version used in this article.
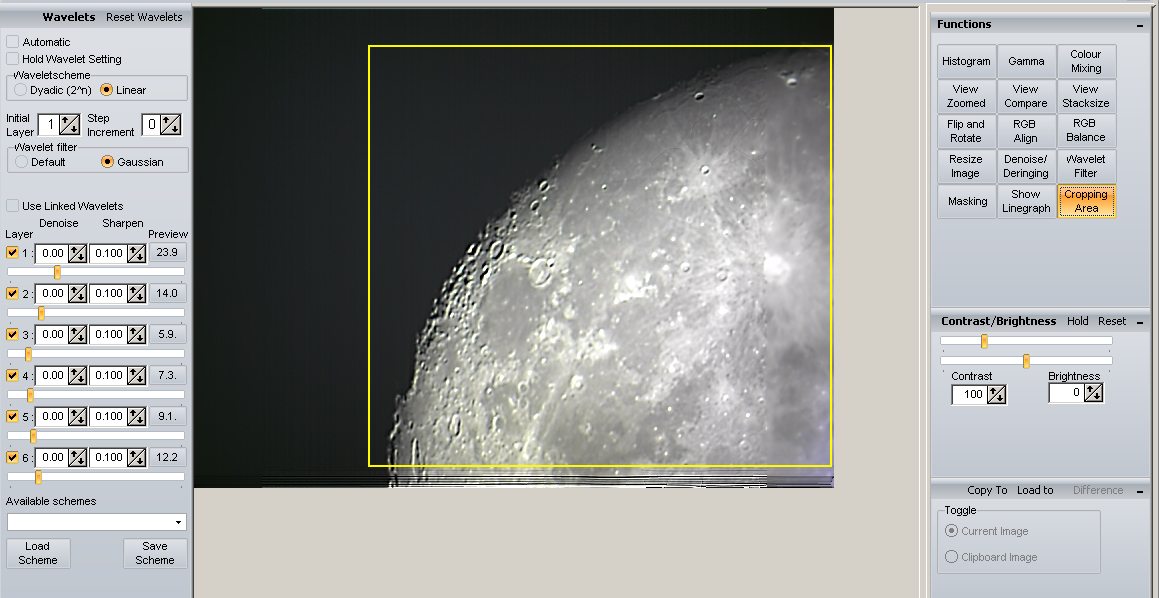
When you start Registax you will see a blank canvas with some menus, tabs, and configuration controls as shown in image 1. The three tabs control the workflow of the application in the three main areas of selection of alignment parameters, aligning, and limiting and stacking the image.
First you need to load in a file. Press select and navigate to your captured files. Selecting one and loading it fills the canvas with the first frame of the file. Using the bottom control you can navigate through the video until you find a good frame to select the alignment points on. With an image like the Moon it is safe to let Registax decide what the align point should be. This is done by pressing the “Set Alignpoints” button. If align points are selected in the dark area of the sky then just adjust the “Lo” intensity value and hit “Set Alignpoints” again. Align points can also be set manually, which is best if you are processing a video of a planet.
Once you are happy with the alignment points hit the align button. This now examines every frame of the video and attempts to determine where each of the align points appear on each frame and then register the offsets for later processing. At this point you can switch on the “Show Aligndata” option to provide a graphical overlay of the movement of each point in the video. You can also turn on the “Registrationgraph” which provides a two dimensional analysis of the frames. This is now used to set up the limits of the video for processing. I try to find a point on the Registration Graph where all parts of the green line are below the red quality line. This is done by selecting “Best Frames %” and then adjusting the values until the cyan marker is in the correct place.
Hitting the “Limit” button now removes the lowest quality frames leaving the ones ready for stacking. If you now select to show the Stackgraph you can move the sliders around to select the number and quality of the frames to be stacked. Once you have made your selections the “Stack” button is selected. This now processes all the registered frames and produces an image similar to the one below:
As you can see this has taken the alignment information into account leaving a stepped overlay effect at the bottom of the image. Now we move on to the “Wavelet” tab. This is where all the magic happens. There are six different layer sliders in the left hand panel, these apply different amounts of sharpening to the image at various levels. Layer 6 provides the roughest sharpening down to layer 1 giving the finest control over the image. Even after stacking and consolidating all of the good data there is still a seemingly unfocused poor image. Applying the wavelet filters really pulls out the detail of the image and creates a stunning image from what at first sight looks like a poor image.
When you have the wavelets adjusted to your liking you can then start using the various functions in the panel to the left to make some further adjustments. I will often save the image at this point and then edit it in PhotoShop, a professional image processing package. I normally apply a high pass filter to it, followed by an unsharp mask.
I have used a partial image of the Moon here as it is large and easy to see the effects go the process. The same steps apply to processing planets, but they can be a little trickier due to the much smaller size of the object. My setup does not allow a full image of the Moon. To get a full image I would need to create about six images and then merge them all together. To do this I would have to take all the source videos at the same time. This is because the Moon does actually move slightly and the illumination of the surface changes from day to day, and even hour to hour.
You can now see how technology can transform the wobbly object on the video into a brilliantly sharp clear final image. Compare the before and after images to see difference stacking and application of wavelets makes to bring out detail in the otherwise fuzzy shot.
Ask the Astronomer: Astronomy Cafe’s most popular FAQs
 Available at Amazon.com, Dr. Sten Odenwald’s newly-released reference book – “Ask the Astronomer” – consists of questions submitted by the public and Odenwald’s answers, taken from the author’s “Ask the Astronomer” internet website at the Astronomy Cafe. This is a compilation of the Top-100 questions answered at The Astronomy Cafe between 1995 and 2013.
The topics range from Higgs bosons and the nature of gravity, to extra solar Earth-like planets and global warming. There is also a collection of tables that include a list of nearby black holes, the most distant objects in the universe, and asteroids that may hit Earth.
Also newly available from Odenwald is “Solar Storms: 2000 years of human calamity.” Culled from thousands of newspaper headlines and stories since the early-1800s, this book gives a personal, human insight to the most dramatic 150 ‘space weather’ events.
This article appeared in the 10th issue of RocketSTEM.
Download PDF Issuu Reader Buy Print Edition
)